Archive for the ‘Javascript Coding’ Category

Interesting Proxy of Javascript Objects

Saturday, March 27th, 2021

Javascript

Ran into something this week, and I wanted to distill it to an understandable post and put it here for those that might find a need, and run across it while searching. There are a lot of posts about the use of the Javascript Proxy object. In short, it's goal is to allow a user to wrap an Object - or function, with a similar object, and intercept (aka trap) the calls to that Object, and modify the behavior of the result.

The examples are all very nice... how to override getting a property value... how to add default values for undefined properties... how to add validation to setting of properties... and all these are good things... but they are simplistic. What if you have an Object that's an interface to a service? Like Stripe... or HelloSign... or Plaid... and you want to be able to augment or modify function calls? What if they are returning Promises? Now we're getting tricky.

The problem is that what's needed is a little more general example of a Proxy, and so we come to this post. 🙂 Let's start with an Object that's actually an API into a remote service. For this, I'll use Platter, but it could have as easily been Stripe, HelloSign, Plaid, or any of the SaaS providers that have a Node Client.

We create an access Object simply:

  const baseDb = new Postgres({
    key: process.env.PLATTER_API_KEY,
  })

but Postgres will have lower-case column names, and we really want to camel case where: first_name in the table, becomes firstName in the objects returned.

So for that, we need to Proxy this access Object, and change the query function to run camelCaseKeys from the camelcase-keys Node library. So let's start by recognizing that the function call is really accessed with the get trap on the Proxy, so we can say:

  const db = new Proxy(baseDb, {
    get: (target, prop) => {
      if (prop === 'query') {
        return (async (sql, args) => {
          const rows = await target.query(sql, args)
          return rows.map(camelCaseKeys)
        })
      }
    }
  })

The signature of the query() function on the access Object is that it returns a Promise, so we need to have the return value of the get trap for the prop equal to query, return a function similar in signature - inputs and output, and that's just what:

        return (async (sql, args) => {
          const rows = await target.query(sql, args)
          return rows.map(camelCaseKeys)
        })

does. It takes the two arguments: a SQL string that will become a prepared statement, and a list of replacement values for the prepared statement.

This isn't too bad, and it works great. But what about all the other functions that we want to leave as-is? How do we let them pass through unaltered? Well... from the docs, you might be led to believe that something like this will work:

        return Reflect.get(...arguments)

But that really doesn't work for functions - async or not. So how to handle it?

The solution I came to involved making a few predicate functions:

  function isFunction(arg) {
    return arg !== null &&
      typeof arg === 'function'
  }
 
  function isAsyncFunction(arg) {
    return arg !== null &&
      isFunction(arg) &&
      Object.prototype.toString.call(arg) === '[object AsyncFunction]'
  }

which simply test if the argument is a function, and an async function. So let's use this to expand the code above and add a else to the if, above:

  const db = new Proxy(baseDb, {
    get: (target, prop) => {
      if (prop === 'query') {
        return (async (sql, args) => {
          const rows = await target.query(sql, args)
          return rows.map(camelCaseKeys)
        })
      } else {
        value = target[prop]
        if (isAsyncFunction(value)) {
          return (async (...args) => {
            return await value.apply(target, args)
          })
        } else if (isFunction(value)) {
          return (...args) => {
            return value.apply(target, args)
          }
        } else {
          return value
        }
      }
    }
  })

In this addition, we get the value of the access Object at that property. This could be an Object, an Array, a String, a function... anything. But now we have it, and now we can use the predicate functions to see how to treat it.

If it's an async function, create a new async function - taking any number of arguments - thereby matching any input signature, and apply the function to that target with those arguments. If it's a simple synchronous function, do the similar thing, but make it a direct call.

If it's not a function at all, then it's a simple data accessor - and return that value to the caller.

With this, you can augment the behavior of the SaaS client Object, and add in things like the mapping of keys... or logging... or whatever you need - and pass the rest through without any concerns.

Putting async at the Top Level of Node

Thursday, March 25th, 2021

NodeJS

The use of async/await in Javascript is a nice way to make traditional Promise-based code more linear, and yet for the top-level code in a Node script, await can't easily be used, because it's not within an async function. Looking at the traditional top-level script for a Node/Express project, you would look at bin/www and see:

  #!/usr/bin/env node
 
  // dotenv is only installed in local dev; in prod environment variables will be
  // injected through Google Secrets Manager
  try {
    const dotenv = require('dotenv')
    dotenv.config()
  } catch {
    // Swallow expected error in prod.
  }
 
  // load up all the dependencies we need
  const app = require('../app')
  const debug = require('debug')('api:server')
  const http = require('http')

which starts off by loading the dotenv function to read the environment variables into the Node process, and then start loading up the application. But you can't just toss in an await if you need to make some network calls... or a database call.

Sure, you can use a .then() and .catch(), and put the rest of the startup script into the body of the .then()... but that's a little harder to reason through, and if you need another Promise call, it only nests, or another .then().

Possible, but not clean.

If we wrap the entire script in an async function, like:

  #!/usr/bin/env node
  (async () => {
    // normal startup code
  })();

then the bulk of the bin/www script is now within an async function, and so we can use await without any problems:

  #!/usr/bin/env node
 
  (async () => {
 
    // dotenv is only installed in local dev; in prod environment variables will be
    // injected through Google Secrets Manager
    try {
      const dotenv = require('dotenv')
      dotenv.config()
    } catch {
      // Swallow expected error in prod.
    }
 
    // augment the environment from the Cloud Secrets
    try {
      const { addSecretsToEnv } = require('../secrets')
      await addSecretsToEnv()
    } catch (err) {
      console.error(err)
    }
 
    // load up all the dependencies we need
    const app = require('../app')
    const debug = require('debug')('api:server')
    const http = require('http')

While this indents the bulk of the bin/www script, which stylistically, isn't as clean as no-indent, it allows the remainder of the script to use await without any problem.

Not a bad solution to the problem.

Google Cloud has some Nice Tools

Saturday, March 13th, 2021

Google Cloud

Today I've been working on some code for The Shop, and one of the things I've come to learn is that for about every feature, or service, of AWS, Google Cloud has a mirror image. It's not a perfect mirror, but it's pretty complete. Cloud Storage vs S3... Tasks vs. SQS... it's all there, and in fact, today, I really saw the beauty of Google Cloud Tasks over AWS SNS/SQS in getting asynchronous processing going smoothly on this project.

The problem is simple - a service like Stripe has webhooks, or callbacks, and we need to accept them, and return as quickly as possible, but we have significant processing we'd like to do on that event. There's just no time or Stripe will think we're down, and that's no good. So we need to make a note of the event, and start a series of other events that will to the more costly work.

This is now a simple design problem. How to partition the follow-on tasks to amke use of an efficient loadbalancer, and at the same time, make sure that everything is done in as atomic way as possible. For this project, it wasn't too hard, and it turned out to actually be quite fun.

The idea with Cloud Tasks is that you essientially give it a payload and a URL, and it will call that URL with that payload, until it gets a successful response (status of 200). It will back-off a bit each time, so if there is a contention issue, it'll automatically handle that, and it won't flood your service, so it's really doing all the hard work... the user just needs to implement the endpoints that are called.

What turned out to be interesting was that the docs for Cloud Tasks didn't say how to set the content-type of the POST. It assumes that the content-type is applciation/octet-stream, which is a fine default, but given the Node library, it's certainly possible to imagine that they could see that the body being passed in was an Object, and then make the content-type applciation/json. But they don't.

Instead, they leave an undocumented feature on the creation of the task:

  // build up the argument for Cloud Task creation
  const task = {
    httpRequest: {
      httpMethod: method || 'POST',
      url,
    },
  }
  // ...add in the body if we have been given it - based on the type
  if (body) {
    if (Buffer.isBuffer(body)) {
      task.httpRequest.body = body.toString('base64')
    } else if (typeof body === 'string') {
      task.httpRequest.body = Buffer.from(body).toString('base64')
    } else if (typeof body === 'object') {
      task.httpRequest.body = Buffer.from(JSON.stringify(body)).toString('base64')
      task.httpRequest.headers = { 'content-type': 'application/json' }
    } else {
      // we don't know how to handle whatever it is they passed us
      log.error(errorMessages.badTaskBodyType)
      return { success: false, error: errorMessages.badTaskBodyType, body }
    }
  }
  // ...add in the delay, in sec, if we have been given it
  if (delaySec) {
    task.scheduleTime = {
      seconds: Number(delaySec) + Date.now() / 1000,
    }
  }

The ability to set the headers for the call is really very nice, as it opens up a lot of functionality if you wanted to add in a Bearer token, for instance. But you'll have to be careful about the time... the same data will be used for retries, so you would have to give it sufficient time on the token to enable it to be used for any retry.

With this, I was able to put together the sequence of Tasks that would quickly dispatch the processing, and return the original webhook back to Stripe. Quite nice to have it all done by the Cloud Tasks... AWS would have required that I process the events off an SQS queue, and while I've done that, it's not as simple as firing off a Task and fogetting about it.

Nice tools. 🙂

Working with Node/JS and Express for Services

Tuesday, December 29th, 2020

Javascript

At The Shop, we are using a completely different platform than I've used in the past - Node/JS and Express as well as Platter, for a back-end database. It's been a steep learning curve for me, but I have to say today was a nice day where I really started to feel like I was getting the handle on the tools. What has really exciting to me with Express is the ease with which I can build middleware to insert into the calling stack.

For ring middleware, in Clojure, it's not horrible, but it's not trivial to understand the calling order, and the passing of the handler to all the middleware. In Express, it's far simpler - you simply have a function that takes the request, the response, and the next in the line of the calling stack, and that's it. You can augment the request, and that's basically what a lot of middleware is about - adding authentication tokens, looking up permissions, etc. It's all adding to the request to be used in the simpler endpoint routes.

When working with Passport for the authentication framework, it's great that it fits in with Express so well, but one of the issues that I ran into today was that the middleware added to the top-level Express app would be executed before the Passport authentication middleware that was in place on each individual endpoint. It makes sense, not all endpoints need authentication, so adding that with Passport would naturally be done after the top-level middleware. But that makes some of the middleware I'd written unfunctional.

The Passport authentication scheme can be set up to easily add the user object to the Express request, and then for all endpoints, it's "Just There". I had expected to add middleware that would take that user and use it to look up other attributes and data to add to the request as well. But if the middleware I'd written was placed at the top-level, then it wouldn't have the user object on the request, and so it'd never work.

The solution was so elegant, I'm convinced that this had to be anticipated by the Express developers. 🙂 Each of the routes wired into the Express app takes a path and a router:

  app.use('/login', loginRouter)
  app.use('/company', companyRouter)

and when you add in the Passport support for JWT authentication with a Bearer token, you get something like:

  app.use('/login', loginRouter)
  app.use('/company', passport.authenticate('jwt', { session: false }), companyRouter)

where the /login endpoint is not protected by the JWT, and the /company endpoint is. This seemed like a very late stage to put in the Passport middleware, but as it turns out, Express can handle an array, or a list of middleware in the use() function. So we can say:

  const authStack = [
    passport.authenticate('jwt', { session: false }),
    tenantMiddleware,
    accountMiddleware,
  ]
  app.use('/login', loginRouter)
  app.use('/company', authStack, companyRouter)

where the authStack is the additional middleware for the individual routes, and it's handled in the order it appears in the array.

And it works like a champ. Just amazing, that we can create different stacks of middleware and then as long as we layer them properly, we can set up an amazing diversity of middleware. For this, it's great that we can group the authentication-focused middleware into an array, and then easily drop that on the endpoints that need it.

Very slick. 🙂

Day 1 at the New Shop

Tuesday, December 1st, 2020

Bob the Builder

Today is the first day at the New Shop, and I'm a bit nervous that it's all going to be Node and React - they are tools I haven't done a lot of work in, but thanks to some help from a good friend, I feel I have a good start, and the Pragmatic Programmer's Simplifying JavaScript really is a good book to get up-to-speed on the latest changes to the language.

There's going to be a lot of learning, and it's going to be a little stressful at times, as I try to come up to speed as quickly as possible... but it's working with some very fine people, and this is the path I'm on... I need to learn all that I can - regardless of the circumstances.

I'm reminded of the chant: The King is dead. Long live the King! Life is a lot like that, it seems... and off we go! 🙂

Setting up Versioned Node Environment

Wednesday, November 25th, 2020

Javascript

Today I spent a little time with a good friend helping me get going on a good, versioned Node environment - a lot like RVM for Ruby - but for Node. I wanted to do this because it looks like I might be doing some work for a Node-based company where the development is all based in Node, and I wanted to make sure I got it all set up right.

I just finished reading a nice book on ES5, ES6, Promises, async and await, and all the new features of JavaScript called Simplifying JavaScript from the Pragmatic Programmers. They are having a Thanksgiving Sale, and it seemed like a great time to pick up a book that I'd probably like on the subject. I did.

It's been a long time since I spent any real time on JavaScript, and if I'm going to be taking a bit out of this project, I wanted to make sure I had come up to speed on JavaScript, and Node as well. The book was laid out well, with all the ideas based on a decent understanding of JavaScript, but not the latest additions. It really read well to me, and I was able to finish it in two days.

So, here's what I needed to do on my 16" MacBook Pro to get things up and running... 🙂

Start off by installing nodenv from Homebrew. This is the equivalent of rvm, and will manage the Node versions nicely for me.

  $ brew install nodenv

I then needed to add in the environmental set-up in my ~/.zlogin file by adding:

  # now do the nodenv stuff
  eval "$(nodenv init -)"

right after I set up my PATH and RVM environment things. It's very similar to the RVM approach, with directory-level controls, as well as system-wide defaults.

At that point, I can source my ~/.zlogin and then I'm ready to go. Next, is to install a good, long-term stable (LTS) version of Node:

  $ nodenv install 14.15.1
  $ nodenv global 14.15.1

where the second command sets that version as the global default for new projects, etc. You can always check the versions with:

  $ nodenv versions
  * 14.15.1 (set by /Users/drbob/.nodenv/version)

Next was to install a few global tools with npm that I'd need:

  $ npm install -g express-generator
  $ npm install -g nodemon
  $ nodenv rehash

where the first is the basic RESTful pattern for a service, and the latter is a way to run a Node app while monitoring the filesystem for changes to the files, and reloading them automatically. This will no-doubt prove to be exceptionally handy. The rehash command is something he's found to be nexessary when installing new global tools, as they don't seem to properly get picked up in the PATH without it. Fair enough.

At this point, we can make a new project, just to play with the new features in the book. Start by making a directory to put all this, and then use the express-generator to make the skeleton we need:

  $ mkdir playground
  $ cd playground
  $ express api --no-view

and now, in the api/ directory we have what we need to get started. Simply have npm pull everything down:

  $ cd api
  $ npm install

and we are ready to go.

There is an index.html file in the public/ directory, and we can use that... and running the Node server is as simple as:

  $ node bin/www
  ... this is the log output... 

or if we want to use the file-watching version, we can say:

  $ nodemon bin/www
  ... this is the log output... 

The port is set in the bin/www script, but I'm guessing the default is port 3000, so if you go to localhost:3000 you'll see the GET calls, and the page. Very slick... very easy. 🙂

Once I get this into a git repo, or start working on a real project/git repo, I'll see if I can get it loaded up on my iPad Pro using play.js - as it appears to be able to run all this, and have a web page to hit it... so that would be very interesting to work with - given the power of the iPad Pro, and the perfect size.

UPDATE: Indeed... once I pused the code to GitHub, and then went into play.js on my iPad Pro, I could Create a new project, from a Git Clone, and putting in the repo location, and the SSH Keys, etc. it all came down. Then it was just resolving the dependencies with the UI, and then setting the "start" command to be the npm command in the package.json, and then it ran.

Open up the play.js web browser, and it's there. On port 3000, just like it's supposed to be. And editing the file, refreshing the page - it's there. No saving, it's just there. Amazing. This is something I could get used to.

Fantastic Lighthearted Javascript Graphing Package

Monday, November 18th, 2019

Javascript

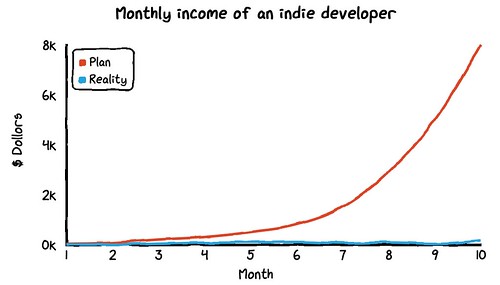
This morning I was reading the newsfeeds, and came across probably my favorite Javascript graphing package: Chart.xkcd. The idea is that it can be used to create those seemingly hand-drawn charts the the xkcd comic so often generates as part of their work. But this is easily put into React and other web frameworks, and put on web pages for that casual look that brings a completely different feel to the data being presented.

From the simple docs on the web page, it seems pretty straight-forward... you have to set up all the data for the graph, and then it just renders it. There are some nice mouse-over features as you dig a little deeper, but it's the casual nature of the presentation that really appeals to me:

Example of Chart

I don't have a project yet that's in need of this, but I can feel that there will be something coming soon that could really use this less-serious approach to data presentation. After all, not everything is a publication-ready presentation.

Creating a Demo Movie

Thursday, January 17th, 2019

iMovie.jpg

This week has been a Hackathon at The Shop, and I was asked to do one on a cross-domain, secure, component-based Web App Framework based on the work done at PayPal in the kraken.js team. It was a steep learning curve for me and the others on the Hackathon team, as none of us had any real experience with Node.js or React, but we had only this week to get something going.

The good news is that we got everything we needed to get running late yesterday, and today I started work on the Demo presentation which happens tomorrow, but it's videos, each group submitting one video. The only limitation is that the video has to be less than 5 min in length - and that's a hard limit I'm told.

OK... so I was looking at all the screen capture tools on the App Store, and some of them looked pretty decent, but the good one was $250, and while I might go that high - I wanted it to be amazing for $250... like OmniGraffle good. And I saw a lot of really iffy reviews. So that didn't seem like the way to go.

Due to the fact that I needed to be able to add in slides and screen grabs, I knew I needed more than a simple "start recording" that Google Hangouts does, and with nothing really obvious in the App Store or in Google searches... well... I hit up a few of my friends in production of stuff like this. Funny thing... they said "QuickTime Player and iMovie"

This really blew me away... I mean I knew about iMovie, but I didn't know that QuickTime Player did screen recordings - and with a selectable region on the screen. And that it also did auto recordings - again, I'm going to need to be able to do voice-overs on the slides and things happening on the screen in the demo.

So I started recording clips. Keynote was nice in that I could make all the slides there, and export them as JPEG files, and they imported perfectly into iMovie. Then I could put them in the timeline for exactly how long I needed them, and do any transitions I needed to make it look nice.

Then I went into a little phone booth we have at The Shop, and recorded the audio with very little background noise. I could then re-record the audio clips as needed to make it all fit in the 5 min hard limit. In the end, I could export the final movie, and upload it to the Google Drive for the submissions.

Don't get me wrong... there was a steep learning curve for iMovie for about an hour. How to move, select, add things, remove things... not obvious, but with a little searching and experimenting, I got the hang of the essentials. And honestly, that's all I needed to finish this Demo video.

I was totally blown away in the end. I was able to really put something nice together with a minimum of fuss, and now that I have the essentials in-hand, it'll be far easier next time. Just amazingly powerful tools from Apple - all installed on each new Mac. If only more people knew...

When are Requirements Not Really Requirements?

Monday, August 6th, 2018

Javascript

I've worked with folks that identify requirements for a system, or a group of systems, that are going to be significant issues for the system - and might be used in maybe 10-20% of the cases that we'll run into. Yes... there is no doubt that if it is needed, then having it integrated into the very core of the system will make it very easy to add. But for those times when it's not needed, it's an unnecessary complexity that will cost every project in many little ways:

  • Increased Dependencies - there is no need to include things that aren't used, but if you make it part of the scaffolding in the web app - it's there whether you want it tor not.
  • Training and Discipline - since this is not natural for Javascript, it's going to mean that the developers that do this coding will have to be trained not to break the rules of the new scaffolding, and they will have to have more discipline than they'd otherwise have to in order not to violate a rule of the system and endanger the system.

and while this doesn't seem like a lot - it's really quite a bit when you're trying to bring in large groups of decoupled web developers. They don't mean to be careless, but UIs seem to get re-written about every nine months to a year, as the new Javascript framework is released, and if not compatible with the old. So it's almost like the UI code is throw-away code.

Not that I'm a fan fan of throw-away code, but I do recognize what's happening in this industry, and that's just whee things are headed. Evidence is hard to ignore.

So... when is a requirement not really a requirement? If it's for a small percentage - really it's hedging a bet that this will be needed. Because if it's never needed, or has limited need, the cost will far exceed the benefit, and this will be seen as a massively complex system. No one wants that.

For now, I'm being told it's a requirement and that means in it goes. If they are right - then it'll be one of the best projections I've ever seen, and they will be heralded as a true visionary. But if not... well... it could easily go the other way.

Sharing Login Auth Tokens

Saturday, January 30th, 2016

Javascript

Over the past several months we have built several Clojure/Javascript apps at The Shop, and each one has needed to have some level of authentication, and thankfully, that's all been provided by the Security Service that was already built and maintained by another guy at The Shop. It works, what else would we need? You get authentication tokens (UUIDs) and you can get information about the user based on the token, and you can't really guess an auth token for a user, so they are pretty decently secure.

But they were app-specific because we tied them to the cookies on the pages, and those pages were all from a site that was different for each app we were building. This meant that you'd have to login to three, four apps a day with the same credentials, and still not have a clean, guaranteed way of invoking a page in one app from a page in another.

This is what I wanted to solve.

This morning, it came to me - there had to be a way to store the auth tokens in a cookie that was across the apps, and then just use that as a standard for all apps. Simple. Since it was still secure (enough), we didn't have to worry about folks yanking the token, or even knowing who the token belonged to.

The question was How?

Thankfully, jQuery has this all solved with the domain: tag in the $.cookie() function. All we needed to do was to have a consistent upper-level domain for the apps that also worked for local development.

What I came up with was a simple function:

  function loginDomain() {
    var here = document.domain;
    if (here === 'localhost') {
      return here;
    }
    var parts = here.split('.');
    parts.shift();
    return parts.join('.');
  }

so that we would have a single login for the production hosts on theshop.com and another for the development hosts on da-shop.com. This would work perfectly if I could update all the places that the cookie was accessed.

What I learned was that the accessing of the cookie did not need to have the domain: tag, but setting it - or deleting it did. So for example, to read the token, I'd say:

  var tok = $.cookie('shop-auth-token');
  if (tok) {
    // ...
  }

and no matter where the cookie was saved, if it's in the "domain path", then it's OK. But when I needed to set the cookie I'd need to:

  var exp = new Date();
  exp.setTime(exp.getTime() + (8 * 60  * 60 * 1000));
  $.cookie('shop-auth-token', tok, { domain: loginDomain(),
                                     expires: exp );

and when I needed to invalidate it:

  $.removeCookie('shop-auth-token', { domain: loginDomain() });

Once I got these all set up, and in each application, one login on the specific login domain would then be successfully used on all apps in that domain with this code. Sweet! It worked like a charm, and it took me about 90 mins to figure this out, and put it in all the apps we have.

Big win!